Friday, January 6, 2012

The Greenhouse: From the Start to Where It Stands Now

My greenhouse is finished ... at least to the point that it is usable and functional and will get me through the winter.  It's been a long road, with unexpected delays and challenges.  I am incredibly satisfied with the way it's turned out so far.  To celebrate, let's step back in time and take a look at this project from the beginning.
 This greenhouse is a testament to recycled materials and out-of-the-box thinking.  For the whole summer of 2008, I prowled Craig's List and salvage yards collecting windows and other materials.  Once I had enough, I used graph paper to design the greenhouse structure to best use the available materials.  (The greenhouse is 12 feet wide and 20 feet long.)


It's hard for me to believe that this is the first photo I have of the greenhouse construction.  Normally, I would have details of how we sited it, construction of the foundation (made from salvaged 6x6 timbers), and so on.  At this point, the foundation is finished, the gravel floor is in place, and we have two walls up.


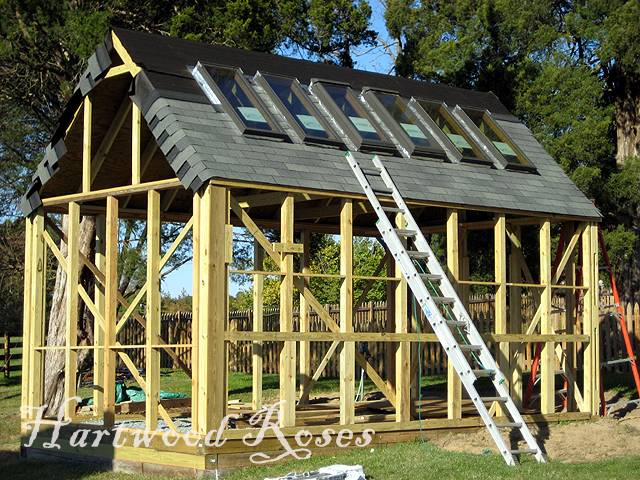
I hired a handyman to help me with the initial framing.  I hate ladders (though I use them when I have to) and it seemed most prudent to use skilled labor to help get the frame up quickly and efficiently.  This decision wasn't without problems, because it was difficult for him to come into a project like this ... an out-of-the-box design wasn't what he was accustomed to doing. 


The handyman came in most 'handy' for the roofing and skylights ... since I avoid ladders, remember.  The skylights are another Craig's List find, salvaged by a builder on a remodeling job he was working on.


At this point, it's late October 2008.  The weather is turning cold and I have to get this greenhouse into service to hold my roses over the winter, and the handyman and I are having a disagreement about how to best install the salvaged windows to close up the building.  MY project ... MY design ... no arguments allowed.  Because I was running out of time with winter approaching, and it was more important to USE the greenhouse than anything else.  I sealed the building up by wrapping the walls in greenhouse plastic, and this is how it stayed for THREE years.


FAST FORWARD to this summer.  

The greenhouse, still wrapped in plastic, was perfectly functional ... but less than the lovely element in the landscape that I envisioned it could be. I vowed that was the year that I would FINALLY install the windows and finish the greenhouse according to my original plan. 

I stripped off the plastic, removed the window framing that had been installed by the handyman, and I set off to finish this project alone.

Functional, but ugly.


I can see daylight.

Ready for action!

What a view!


Each window fits into a specific opening, and I laid them out ahead of time to make sure that the plan would go together like I imagined it.  Having gathered sets of windows from entire houses helped this process immensely ... all of the windows I used are 28 inches wide, with groups of them the same length, so they could be arranged fairly logically.  (The graph paper plan was a BIG help figuring this out!)


To actually install the windows, I first screwed 1x6 pressure treated boards to the outside of the 4x4 frame members, creating a 1-inch lip in each opening on the inside of the greenhouse.


The windows on the top row are each screwed to this lip from the inside, using 2-inch exterior grade screws.


The second row of windows is hinged so they can open to ventilate the building in summer.  I screwed a strip of 5/4 board to the bottom of the top window, clamped the second window into place, and installed two galvanized hinges on each bottom window.


Instead of using hardware to keep the windows latched, I put a screw in each bottom corner form the inside to hold the window closed.  In summer, I will simply remove the screws and prop the windows open.

There's that view again!


Bottom row ... finished.


It was the same process for all four walls of the greenhouse.


In order to use the smaller windows I had on hand, the north wall has three rows of windows.  The top and bottom row are fixed, and the middle row is hinged.


Here is the view toward Hartwood Winery on the north side of the greenhouse.


The space below the windows on each wall is covered with plywood.  I would have loved to continue the windows all the way to the floor, but having the plywood base makes a much stronger and more stable building.  Each opening below the windows needed a little bit of framing to support the plywood.


It took a couple of days, but soon all four walls of the greenhouse had their plywood and things were beginning to look almost finished.


Next step ... trim and corner boards.  These decorative elements are actually functional, sealing up the spaces between the windows and the plywood.

The corner boards are not pressure-treated, but they have two coats of primer on their back sides to protect them from the moisture inside the greenhouse.


Last week, The Husband helped me install the ceiling fan ... which creates air circulation and keeps the expensive propane-heated air off the ceiling and down by the roses where it belongs.  I spent an afternoon caulking and weather-stripping the cracks around the windows, and the greenhouse is finally finished ... for now, that is.

Next year, when the weather is warm, I get to do the fun part of this job.  The plywood in the gable ends will come out and be replaced with glass ... those large spaces are framed to accept the Gothic church windows you saw at the beginning of this post.  The plywood panels at the bottom of each wall will be covered with decorative shingles (left over from construction of our green garage that you can see in the background of some of my photos.)  Each window opening will get decorative molding, inside and outside.  The last thing will be paint ... I wonder what color?

The inside of the greenhouse is still a mess, but the roses are all tucked inside to safely spend the winter.


It's been a struggle to stay on track to get the greenhouse to this point.  Many times, other projects have tempted me ... but I did the best I could to stay focused and see this one through.  Though it's not truly, completely FINISHED, it's finished to the best of my ability for now ... and it feels really, really good to check this one off of my list.

If any of you who are reading this would like some advice or encouragement for your own project, I will be happy to see what I can do to help.  Building this greenhouse was an exercise in using what I had on hand, devising construction methods to make best use of salvaged materials, and I love the results.

If you would like to see more of the process that went into the construction of the greenhouse, click on the 'Greenhouse Windows' tag below to see all the 2011 blog entries that I posted as construction was happening.


39 comments:

  1. Wow! Very impressive! I love the look of it too and the fact that you used salvaged materials. Nice that you can use it now!~Patti

    ReplyDelete
  2. This project just amazes me. Do you think that this spring you can do a Photo Tour of the interior and show - with pictures - exactly how you hinged the windows and how they open, etc.? For some reason I'm having trouble seeing it in my head - ha!

    ReplyDelete
  3. Wow this is SO impressive! What a great way to reuse and recycle materials for something so functional. Great job!

    Your newest follower,
    Megan

    ReplyDelete
  4. I am jealous and inspired! What a fantastic job ; )

    ReplyDelete
  5. It's a good thing I don't have a greenhouse like this because I would spend ALL my spare time in it and nothing else would get done!

    Wonderful, wonderful space!

    ReplyDelete
  6. I am so proud of you! This project is not only a testament to your determination but also your vision to use recycled materials. This project is amazing and I hope you win the contest! Hugs, Linda

    ReplyDelete
  7. This is one of my favorite projects to follow along- so charming!! :)

    ReplyDelete
  8. It is coming along so well!! I missed the 2008 part of the project, and I love that you were able to find such goodies at salvage yards and on Craigslist. I can't wait to see the Gothic windows installed. Take good care of your roses this winter, I'm hoping to find good places for a few this spring!

    ReplyDelete
  9. I always wanted to make a greenhouse of salvaged windows.......maybe someday, when I find a piece of property. Looks great! Great Job!

    ReplyDelete
  10. Connie, The greenhouse turned out wonderful and quite a impressive project! Great job.
    xo,
    Sherry

    ReplyDelete
  11. Connie, this is just fab! I'm so glad to see it so close to being finished...I've got to take a field trip and come visit!

    Maybe I can convince Sherry @ No Minimalist Here to come along!

    Happy New Year!!
    Mikey @ Shabby French Cottage

    ReplyDelete
  12. I am so impressed. I think it is beautiful. I wish you the best of luck in the contest.

    ReplyDelete
  13. Wow... I have fantasized about doing exactly this with salvaged windows so I was so interested in seeing your photos and reading about your process. It is so lovely... can't wait to see it painted. Good luck with the contest!

    ReplyDelete
  14. It looks magnificent and I can't wait to see those beautiful Gothic windows installed! And the views you have... how envious I am! I'm envious of the whole thing, your home, land, greenhouse, abilities, energy...

    ReplyDelete
  15. I'm green with envy for your greenhouse...those gothic windows are to awesome!!! I love it!!!

    ReplyDelete
  16. Fantastic!! You deserve to win that contest in my eye's, nice job!

    ReplyDelete
  17. WOW! What an amazing uplifting encouraging achievement. and WHAT A VIEW!!!

    ReplyDelete
  18. I think I would put a bed out there and take up residence!!

    well done!!

    found you at laurieanna's ... funny thing, I was already a follower!

    ReplyDelete
  19. I am so impressed! Give me any craft project to finish, and I can do it, but a whole building...I wouldn't have a clue. You did a great job! And you were so patient!

    ReplyDelete
  20. It's beautiful, and to think you did most of it your self! I'm very impressed! I would love a little greenhouse! A few people in my town have some really fancy ones off their homes . . . they are amazing, but not affordable - well at least not for me!

    Happy New Year, I enjoyed my visit to your green house!

    Mary

    ReplyDelete
  21. When I saw your link I wanted to yell "Yeah, it's done, it's done!" I am so happy for you and it came out so beautifully! You should be so proud of what you accomplished! Going to share on our Facebook page today, thank you for keeping us updated on it's progress at Inspiration Friday!

    Heather

    ReplyDelete
  22. CONGRATULATIONS !!!!

    Love, love, love.

    Garden & Be Well, XO Tara

    ReplyDelete
  23. It is exquisite! I know you will enjoy it!

    ReplyDelete
  24. That is the most beautiful greenhouse ever! I would vote for you for sure~

    ReplyDelete
  25. A MAZ ING!!
    #730 will surely win, you did a fantastic job!
    It is a cathedral of a greenhouse and a wonderful place in which to potter and raise plants.

    ReplyDelete
  26. Hi Connie- what a marvelous feeling of satisfaction you must have! Your greenhouse is beautiful- it is an amazing creation! Truly I am just so impressed with this project and your determination to see it completed. I can't wait to see ut in use later this summer!
    Vicki

    ReplyDelete
  27. That is amazing! I just found your blog and will be adding it to my blogroll! I cannot wait to sit down with a cup of coffee and read through all of it!

    ReplyDelete
  28. Very nice looking structure Connie. I am glad I did not miss this post. It was nice showing the process in images and also the use of reclaimed materials. Good luck on winning.

    ReplyDelete
  29. I am still in awe of what you have created and built...mostly all done by you no less!! I think it is a lovely greenhouse, even in its unfinished state. I look forward to seeing the final stages of completion.
    Keeping my fingers crossed that you are chosen!! You SO deserve it.

    ReplyDelete
  30. so envious. this is FAN.TAS.TIC.

    can't wait to see it finished. i would looove to have the room for such a large greenhouse!

    ReplyDelete
  31. Your greenhouse is truly fabulous and watching the construction was so much fun! You did an impressive job and your hard work really paid off!

    ReplyDelete
  32. I am so impressed! It is beautiful and functional! Great job on it! Thank you for linking it to Home Sweet Home!
    Sherry

    ReplyDelete
  33. Wonderful achievement for you, congratulations. It looks fabulous, and I have greenhouse envy. Color to paint...pink? ;)

    ReplyDelete
  34. I found your blog through a Pinterest pin of this greenhouse & so glad I did! We are in the midst of a very similar project at our place, beginning just where you did - with craigslist windows. I love seeing how you approach the same project and the finished house looks very nice so far. Ours is smaller, at only 8 x 10, but we hope to have it finished for some season-extending veggies late this coming fall. I can't wait to see yours with all the final embellishments!

    ReplyDelete
  35. reading today's blog had a link to go to this post, and you know how much i love your greenhouse, so of course i had to visit virtually! still love it! d

    ReplyDelete
  36. I am totally impressed and inspired. My dear husband and I have built a workshop, two storage type buildings, one we call the barn, and remodeled our little 50's cottage. We used recycled materials when we could.

    Unfortunately for me, but wonderful for him, He left this planet for heaven a year ago on the 9th of Dec. He would have been 65 on the 20th. We were married for 43 years.

    There are unfinished projects. He did all of the work, and I was right by his side as his helper, I miss that. I wish I had learned to used some of the power hand tools, but he handled all of that. They scare me to be honest.

    I still want to learn and accomplish things in this life. I'll be 65 in March. I don't want to think I can't but think I CAN. I live on a limited budget so can't go out and just hire people to do the work.

    I came here via Thistle Cove Farms.

    I look forward to visiting your blog and reading from your archives.

    Have a wonderful 2014 and thanks for being the inspiration that you are.

    FlowerLady

    ReplyDelete
  37. I only started collectin' roses this spring and I have amassed somethin' like 10 heirloom/antique/old garden roses. I am not countin' my hybrid teas. All of them very old and I have the hardest yet most enjoyable time identifyin' them. Any tricks (besides the ubiquitous helpmefind type websites? Readin' you in Kentucky and inchin' my way into the rose grower/breeder (I breed hydrangeas, crepe myrtles, mornin'glory, Buddleia, Japanese maples, rhododendron/azaleas, glads, etc.) club. Thank you.
    sonofnone.db@gmail.com

    ReplyDelete
  38. I told my husband a greenhouse like yours, using recycled materials, would be perfect for my wedding venue. We renovated our smokehouse 2 years ago using reclaimed wood. It's absolutely beautiful. I will post this project one day soon. We will use this cottage as a bridal suite. Maybe we can use something similar to your greenhouse for the groom and his party.

    ReplyDelete
  39. I'm so excited to see this! Its so similar to what I had in my head. We bought an old craftsman style home a few years ago and gutted/rebuilt the whole thing. We've saved all the old windows/doors and materials to build a greenhouse like this!!! Thank you for documenting it so well. Any new photos?

    ReplyDelete

Thanks for stopping by and reading what I share. Comments are welcome and very much appreciated. Spam and trolls are not!

Related Posts with Thumbnails